Moving my laundry outdoors freed me from that cramped closet! My plan started with covering five setup rules: strong shelves, weatherproof materials, drainage, ventilation, and accessible hookups. I chose an all-in-one washer-dryer and added a bar sink for utility tasks. Smart storage like wall racks kept it tidy, and decor blended it with my patio. There’s so much more to explore in making this space your own oasis.
Choose an Outdoor Area Over an Indoor Closet
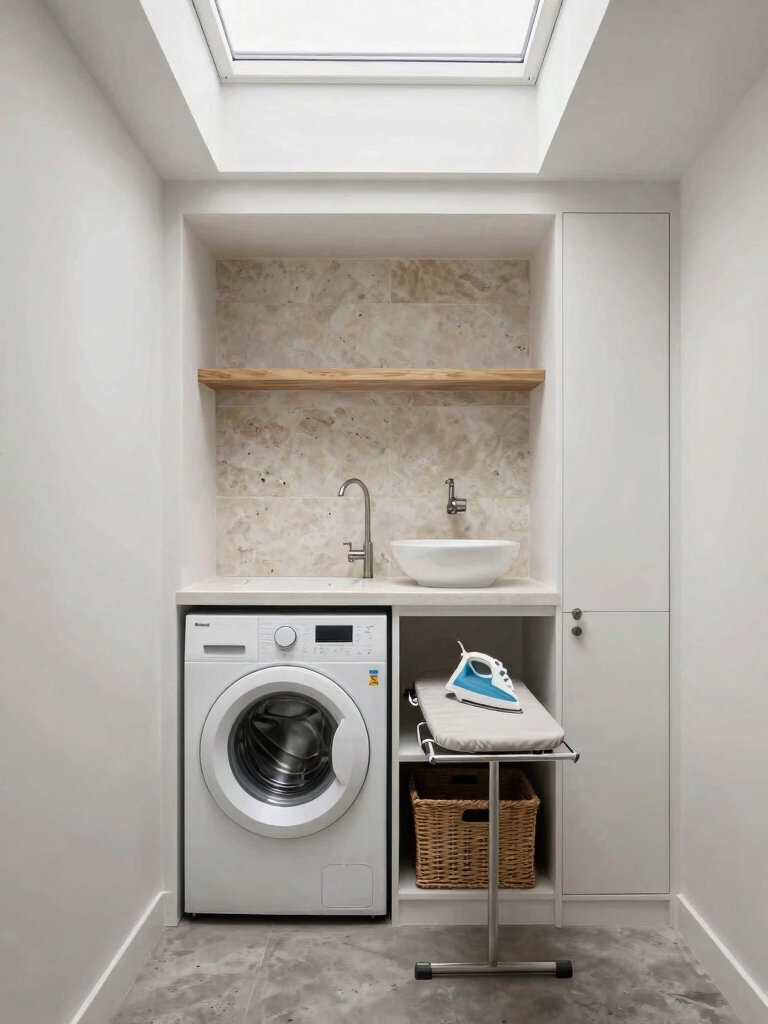
When you’ve got an indoor laundry closet, you often feel cramped.
I think you should consider moving the whole operation outside. A covered patio, garage corner, or even a shaded side yard can transform your chore space.
Suddenly, you’ve got room to sort, fold, and air-dry clothes without bumping into walls. You’ll trade that claustrophobic box for fresh air and a much more pleasant task.
Maximizing your outdoor space with clever storage and organization can make the area feel even larger and more functional, creating a true spacious oasis.
Cover the 5 Non-Negotiable Setup Rules
Okay, you’ve chosen your spot, so let’s lay some ground rules.
I always start my outdoor laundry build with three absolute must-haves.
You’ll need strong vertical shelving, materials that can handle the sun and rain, and a plan for where the water goes and how fresh air gets in.
Incorporating creative laundry room solutions can maximize functionality in even the tightest outdoor spaces.
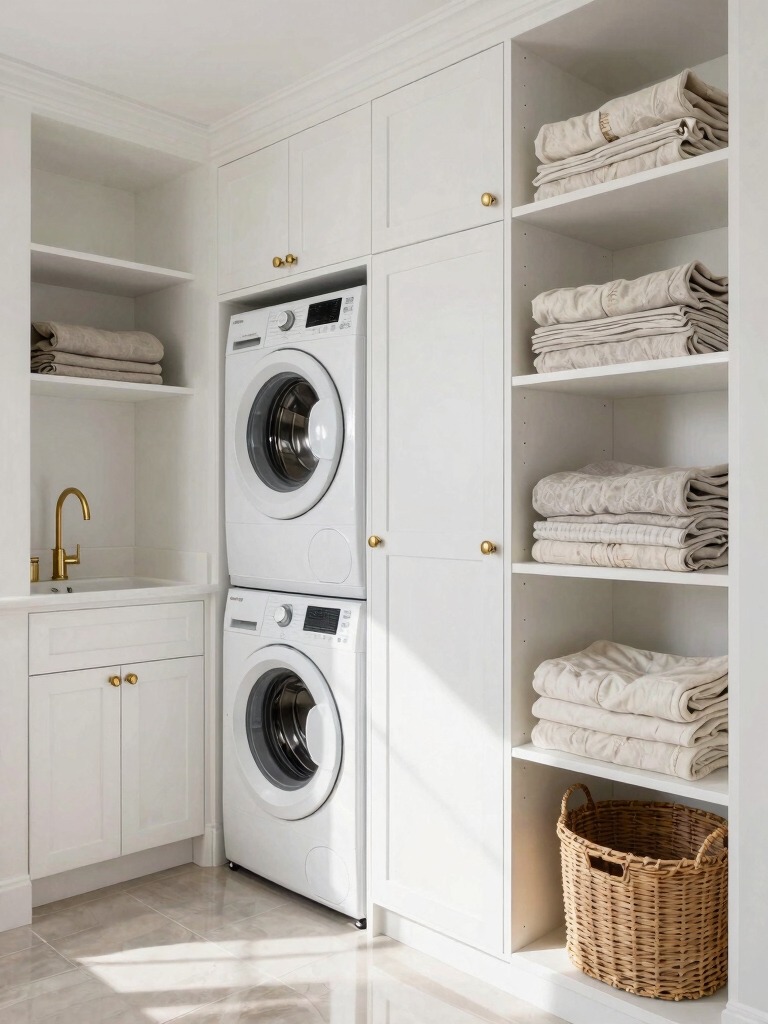
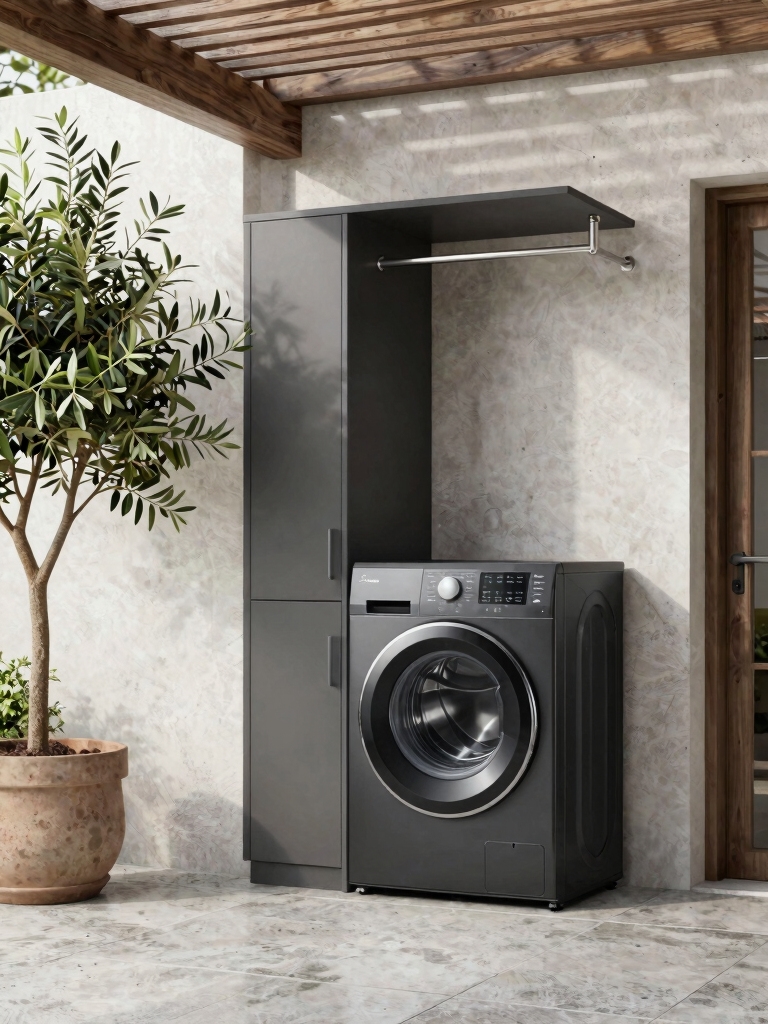
Maximize Vertical Storage
First, you absolutely need to start with a wall that can handle the load.
I always mount my washer and dryer units side-by-side to free up the entire wall above them.
Then, I install sturdy shelving directly over the appliances.
I use tall, narrow cabinets for supplies, and I hang rods from the ceiling for air-drying clothes.
This turns every vertical inch into functional, accessible storage.
Prioritize Weatherproof Materials
Because your laundry space is exposed, the materials you choose must fight moisture, sun, and temperature swings.
I always pick stainless steel or marine-grade polymer for my washer and dryer.
For cabinets, I use weather-resistant woods like teak or synthetic wicker.
A powder-coated metal shelf won’t rust.
These choices create a durable setup that looks good and handles anything the sky throws at it.
Ensure Proper Drainage And Ventilation
Moving beyond your equipment’s finish, you need a foundation that protects against water and moisture.
I always slope my floor toward a drain. I install a roof vent or louvers so moist air can escape, preventing mold.
Good airflow means my machines dry faster and last longer. Don’t let water pool; that’s an invitation for rust.
Think of your space as needing to breathe and shed water easily.
Safely Install Outdoor Power and Water Lines
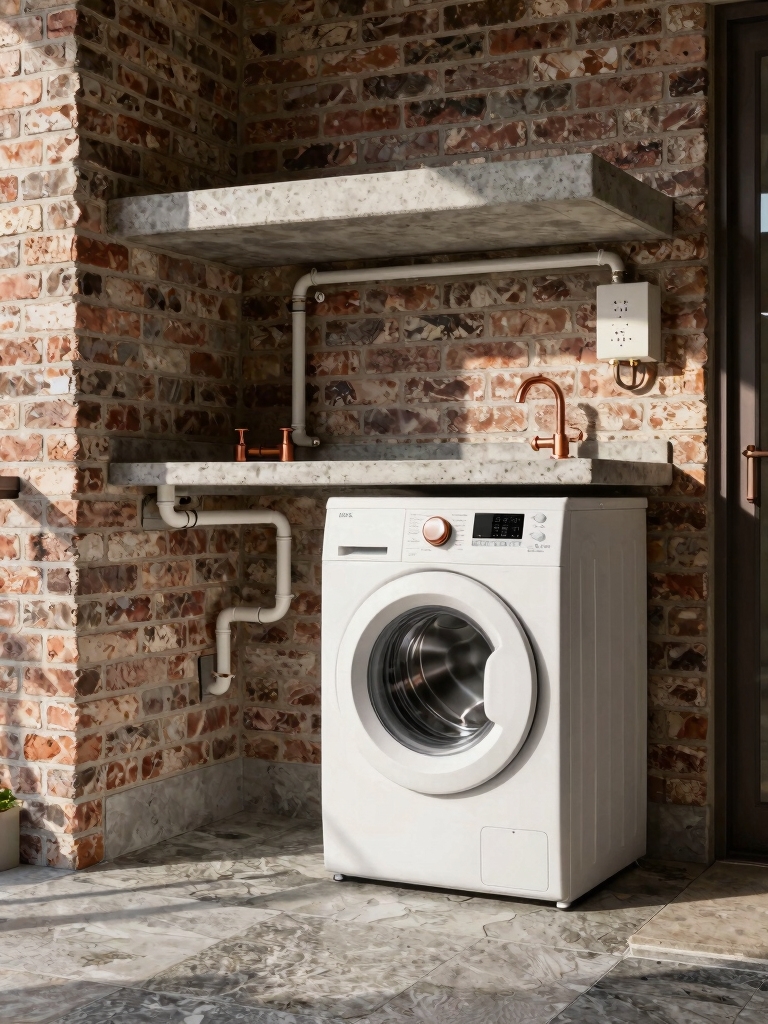
Since you’ll be running appliances and a faucet outside, getting power and water to your laundry station safely is the most critical step in the whole project.
I always hire a licensed electrician and plumber for this. They’ll install dedicated, weatherproof GFCI outlets and proper piping.
Seeing that deep trench for the buried lines makes me confident my setup is protected from the elements and up to code.
Pick Materials That Can Take the Weather
Now, let’s tackle your materials—they’ve got to survive sun, rain, and maybe even snow.
I’d look for stainless steel hardware and marine-grade polymer cabinets; they won’t rust.
Use a weatherproof laminate or sealed concrete for your countertop—it wipes clean after storms.
For the floor, choose textured tile or composite decking that drains easily and won’t get slippery.
These choices mean you won’t be replacing everything in a year.
Incorporating smart solutions can help maximize the functionality of your outdoor laundry room despite the limited space.
Opt for a Space-Saving All-in-One Washer Dryer
I’ll show you how a single, compact unit solves my outdoor laundry problems.
Its integrated drying technology means I don’t need a separate appliance, which saves me room and hassle.
Efficient utility hookups keep the setup simple, so I can connect it and forget about it.
Plus, there are clever laundry room solutions designed specifically for top-loading washers that can further optimize your small space.
Compact Design Solutions
When you’re tight on outdoor space, a space-saving, all-in-one washer dryer can be your best friend.
I choose a compact model that fits neatly under a counter. Its slim profile leaves precious room for a small utility sink, which I place right beside it.
This clever pairing creates a complete but concise laundry station, giving me function without sacrificing my patio’s open feel.
Integrated Drying Technology
Beyond just washing, that same compact unit handles drying clothes in the same footprint.
It’s my game-changer for squeezing a full laundry station onto my patio.
Here’s what I love:
- One-cycle convenience from wash to dry.
- No shuffling wet laundry to a separate machine.
- Steam functions that reduce wrinkles.
- Venting flexibility with condenser or heat pump models.
- Frees up wall space for shelving or hanging rods.
Efficient Utility Hookups
Since I chose an all-in-one washer dryer, I only needed to plan for a single water supply, drain, and power connection.
This streamlined my entire installation and saved precious wall space for cabinets or shelving.
It’s one compact unit handling both tasks, so I avoid the complex plumbing and venting of separate machines.
For my small outdoor nook, this efficiency was the perfect, clutter-free solution.
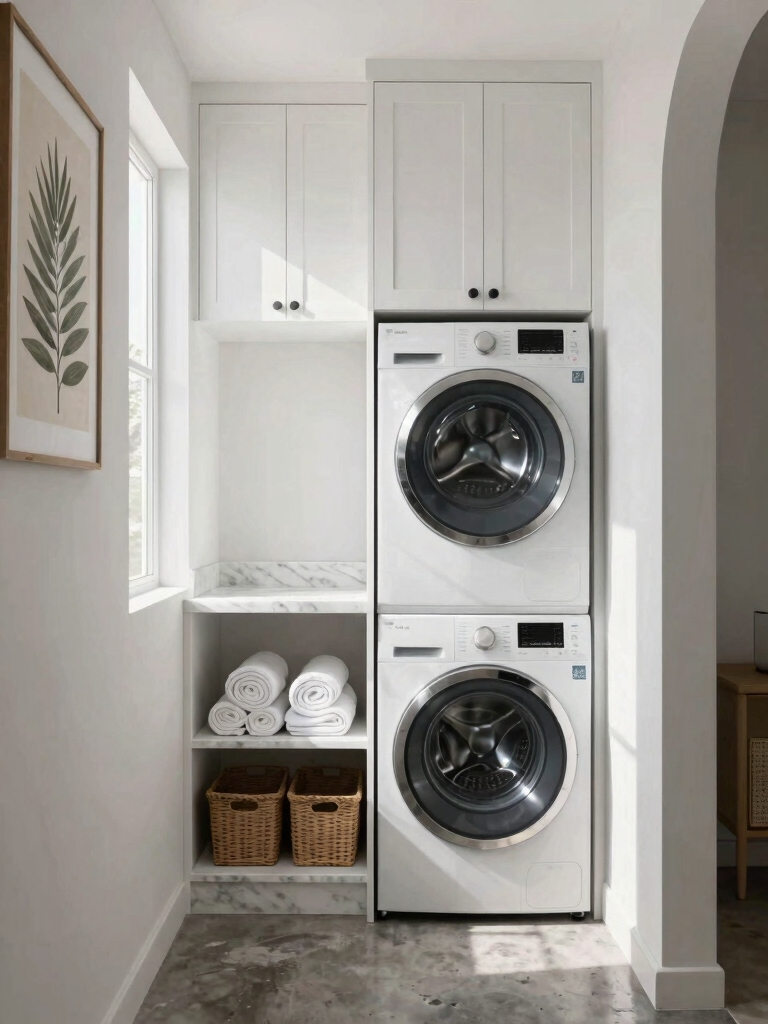
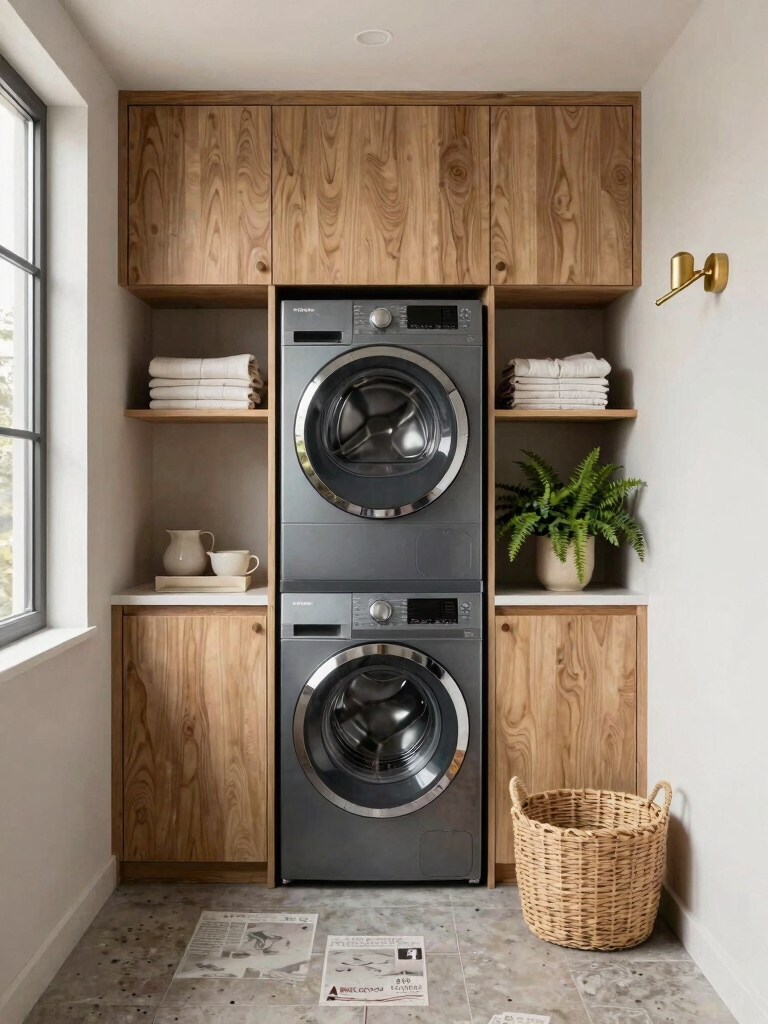
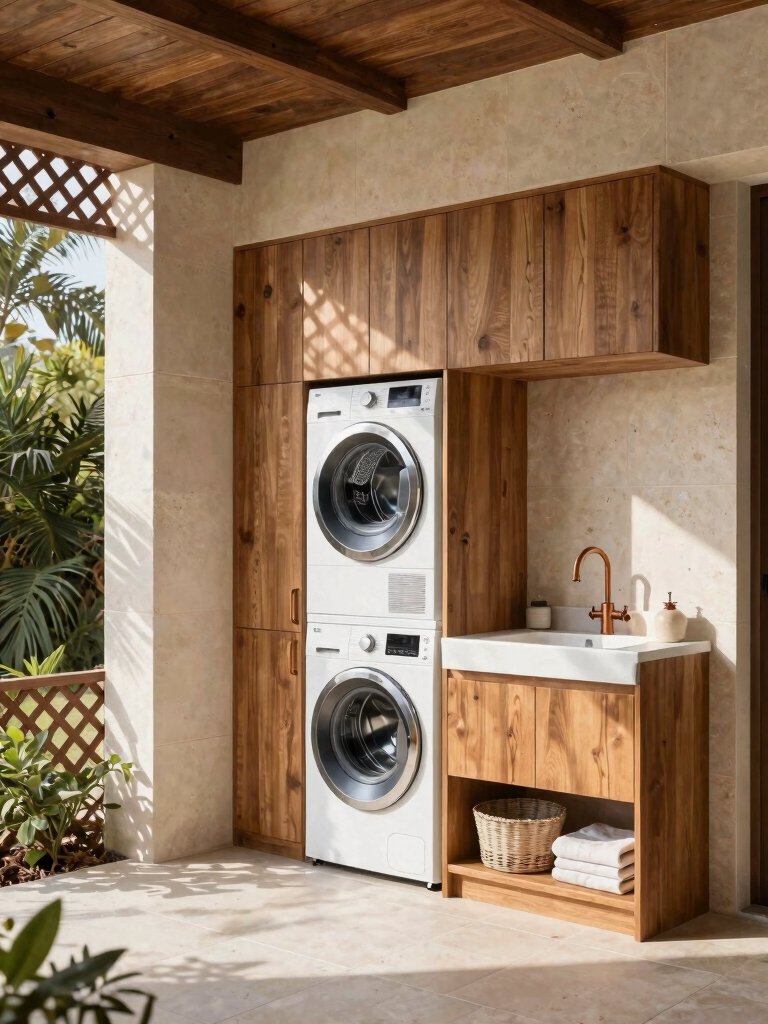
Stack Your Washer and Dryer to Free Up Floor Space
I often stack my washer and dryer vertically to reclaim precious floor space in my outdoor laundry area. It creates room for other essentials and feels instantly more organized.
- Use a sturdy, approved stacking kit for safety.
- This instantly doubles your functional vertical space.
- It leaves perfect room for a sorting cart or hamper below.
- The compact footprint tucks neatly into a corner.
- You’ll appreciate the clear, walkable floor area it provides.
Maximizing vertical space is one of the best small laundry room ideas to fit more into less.
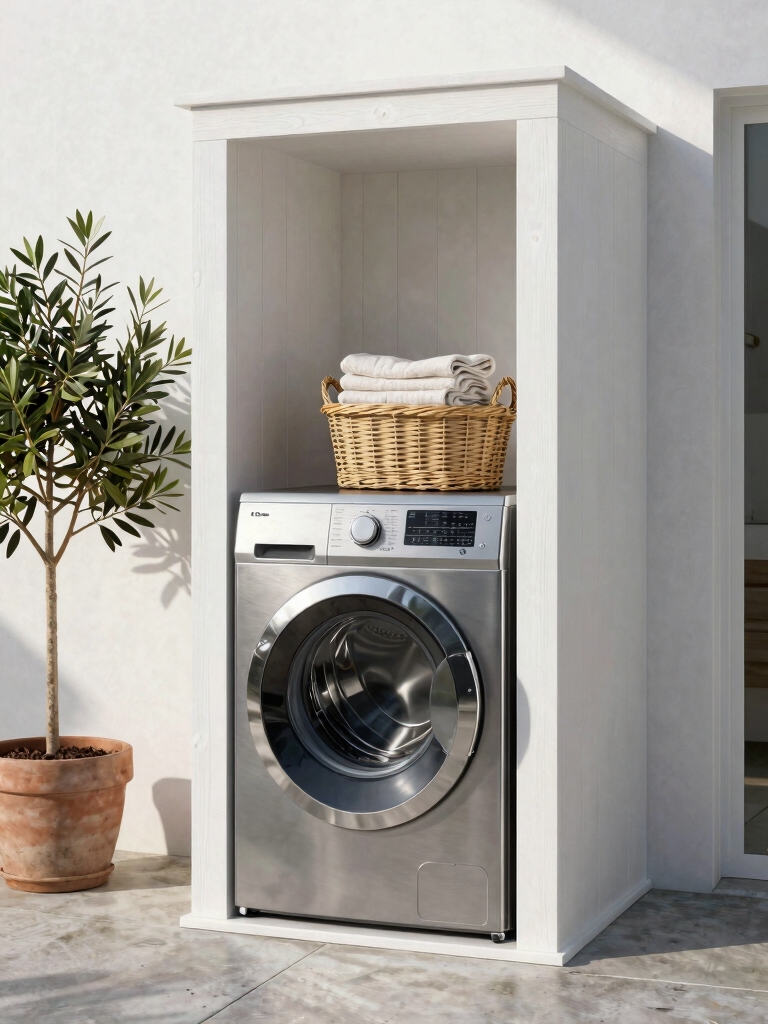
Hide Units in a Custom Weatherproof Cabinet
When you’re designing a functional outdoor laundry space, a custom weatherproof cabinet can elegantly conceal your washer and dryer.
I built one with a sloped roof to shed water, using durable marine-grade plywood and exterior paint.
Adding lockable, louvered doors allows for ventilation while keeping things hidden and secure.
It’s a streamlined solution that protects your machines and keeps your patio looking tidy, not like a utility zone.
Incorporating clever storage solutions maximizes space efficiency and enhances organization in your mini laundry setup.
Tuck a Laundry Nook Under a Covered Staircase
Maximizing unused space, you can also tuck a laundry nook under a covered staircase. This spot naturally shields your machines from the elements.
I focus on creating a functional, all-weather setup that feels intentional.
- Build a simple, slatted base to keep appliances off damp ground.
- Run utilities discreetly along the stair stringer.
- Install a retractable clothesline above for drying.
- Add weatherproof curtains for a polished look.
- Use wall-mounted shelving for supplies.
Incorporating simple organization tips can help transform the chaos into a tidy, efficient laundry area.
Convert a Shed or Storage Locker for Outdoor Laundry
I love the idea of transforming a basic shed into a fully functional outdoor laundry room.
Let’s start by figuring out your essential planning needs, like water and power connections, so you can build a solid foundation.
Then, I’ll show you clever ways to pack in all your laundry gear without the space ever feeling cramped.
Essential Planning Considerations
Because you’ve decided to convert a shed or locker into your laundry space, I’ll help you start with the essential planning considerations to guarantee this practical project succeeds.
First, I carefully assess the structure.
- Check the foundation for levelness and stability.
- Verify waterproof integrity of the roof and walls.
- Plan your utility routes for water, drain, and power.
- Ensure proper ventilation to manage heat and moisture.
- Measure appliance clearances for door swing and hose connections.
Efficient Space Utilization Ideas
When you’re converting a limited area like a shed, consider your appliances’ vertical space.
I’ll stack my washer and dryer to free up the floor. I then use that freed floor for a tall, narrow rolling cart for supplies.
Mounting fold-down drying racks and shelves on the walls keeps essentials handy without clutter.
Every inch counts, so I guarantee my layout is functional before I finalize anything.
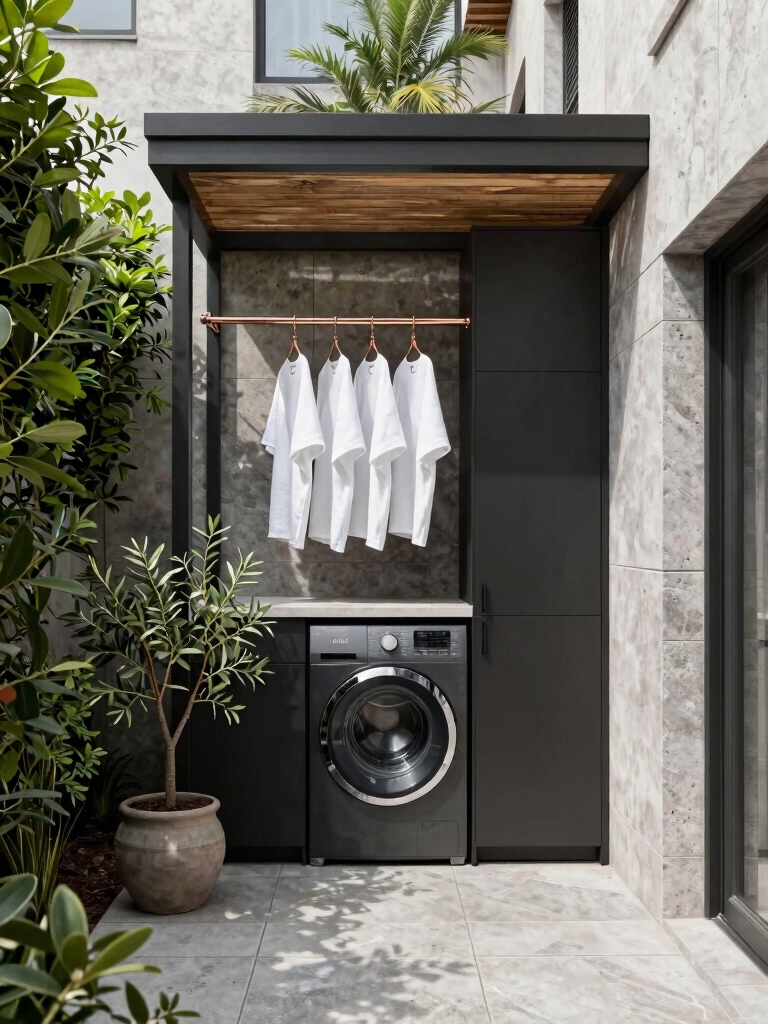
Frame Your Setup With a Simple DIY Pergola
To give your outdoor laundry zone a clear, defined space that feels intentional, I’d suggest framing it with a simple DIY pergola.
It instantly creates a dedicated spot and adds vertical interest without a full roof.
- Use pressure-treated 4×4 posts for the structure.
- Space beams overhead for dappled light.
- It visually anchors your machines and counter.
- Offers a perfect frame for hanging rods.
- Gives you a base to grow climbing vines.
Incorporating smart storage solutions can maximize your utility room’s functionality and improve flow in small spaces like this outdoor setup by adding efficient storage.
Add a Retractable Awning for Sun and Rain Cover
While that pergola defines the space beautifully, you might want more direct protection from the sun or a sudden rain shower.
I’d install a retractable awning above your machines. It’s a shield you can open when needed and close for a more open feel. You’ll get instant shade for working and keep your laundry dry.
Look for a durable, waterproof fabric that rolls up neatly.
Create Privacy With a Slatted Screen
I love how a slatted screen instantly adds privacy while still letting light and air through.
You can choose materials like cedar or composite to match your style and stand up to the weather.
Let’s look at placement and some simple ways to secure your screen so your laundry area feels like a true retreat.
Slatted Screen Benefits
One of the smartest upgrades you can make is adding a slatted screen, as it instantly carves out a private zone without completely boxing you in. The spacing between slats is key—it blocks sightlines but lets in light and air.
I find its benefits go well beyond just seclusion.
- It maintains a breezy, open atmosphere.
- Diffuses harsh direct sunlight.
- Offers a perfect support for climbing plants.
- Visibly defines your laundry area.
- Reduces wind impact on drying clothes.
Choosing Screen Materials
Slatted screens carve out privacy while staying open, and their material choice shapes both function and feel.
I consider wood for a warm, natural look, but I remember it needs sealing against weather.
PVC offers a clean, maintenance-free profile.
Metal feels industrial and sturdy.
Each material diffuses light differently, casting unique shadows.
My pick hinges on balancing how durable I need it to be with the aesthetic I want.
Installation And Placement Tips
To create your secluded outdoor laundry space, you’ll first want to decide precisely where your screen should stand.
- Block the sightline from your neighbor’s window or patio.
- Anchor it firmly into the ground or a heavy planter box.
- Angle the slats to deflect wind while still letting breezes through.
- Leave a gap at the bottom to prevent moisture damage.
- Add climbing vines for extra greenery and privacy.
Utilize Walls With Fold-Down Racks and Shelves
Maximizing your vertical space solves the perennial problem of where to hang clothes in an open-air laundry area.
I install a sturdy, fold-down wall rack above my machine. When I need it, I unfold the rack for drip-drying. When folded, it’s flush against the wall.
I add a matching shelf above it for my detergent, keeping the floor completely clear. It’s my go-to for saving space.
Incorporating smart design tips like fold-down racks and shelves is essential for making the most of narrow or small laundry rooms.
Maximize a Balcony Corner With Vertical Storage
I often turn a tight balcony corner into a laundry station by thinking vertically. A sturdy wall-mounted drying rack keeps linens off the ground, while stacked, foldable bins below hold my laundry loads.
For detergents and supplies, I install a slim multi-level shelf right above it. Incorporating smart and stylish storage solutions ensures the space remains organized and functional without sacrificing style.
Wall-Mounted Drying Racks
Since small balcony corners often feel unusable, a wall-mounted drying rack can transform that awkward space into a versatile laundry station.
I install a fold-down model that tucks flat against the wall when I don’t need it, saving every inch of floor.
- Choose a rust-resistant, powder-coated finish.
- Look for multiple bars to increase capacity.
- Confirm it locks securely in both positions.
- Position it for good airflow and sunlight.
- Use it for towels, delicate fabrics, or sneakers.
Foldable Laundry Bins
Next up is a pair of foldable laundry bins—a simple vertical duo that turns a wasted corner into a hidden sorting station.
I just unfold them and clip them together to create distinct lanes for lights and darks. Their slim, canvas profile tucks right against the wall.
When the loads are done, I fold them flat. They vanish, reclaiming all that precious floor space for my little balcony.
Multi-Level Shelving Systems
To really maximize a balcony corner, you can’t beat the vertical storage of a multi-level shelving system. I think it’s like building your own custom tower for laundry supplies.
You’ll keep detergents and baskets organized without wasting a single inch of floor space.
- Stack baskets vertically for easy sorting.
- Dedicate a shelf to stain treatments and boosters.
- Use the top level for rarely-used items.
- Hang ironing supplies from a side hook.
- Let a trailing plant soften the structure’s edges.
Roll Out a Mobile Laundry Cart for Flexibility
A mobile laundry cart is one of the simplest ways I can add flexibility to my outdoor laundry space.
I use mine as a portable sorting station, moving it between my washer and a sunny drying line. Because it has wheels, I simply roll it out of the way when I’m not using it, which keeps my small patio clear.
It’s a movable surface for folding, too.
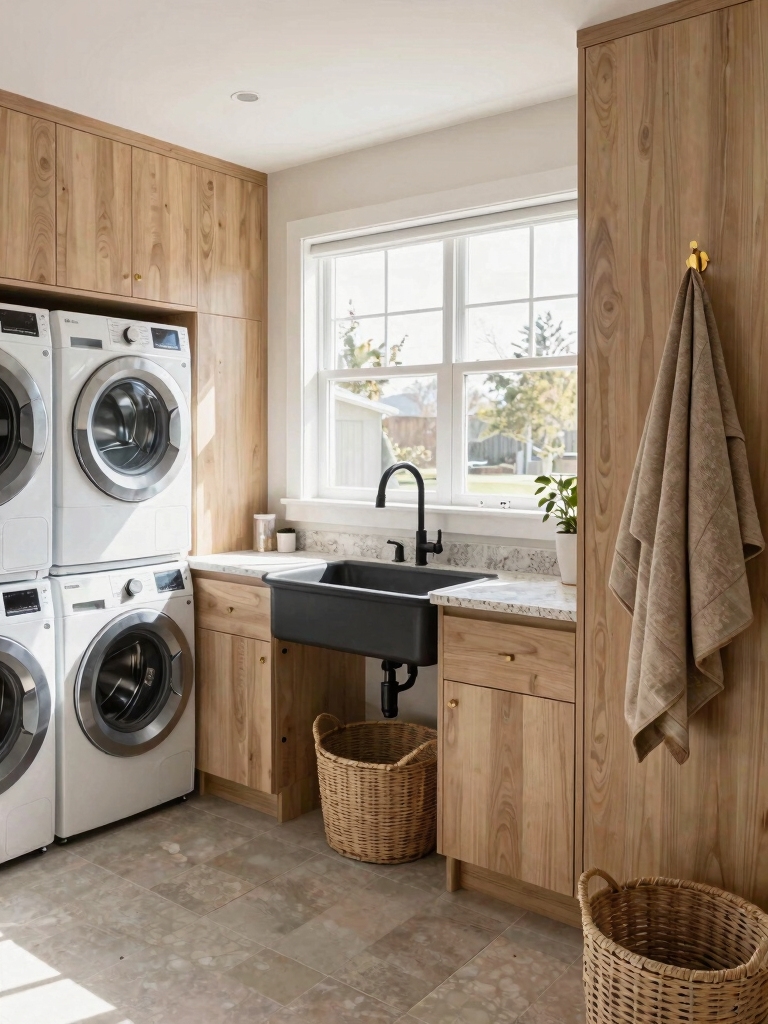
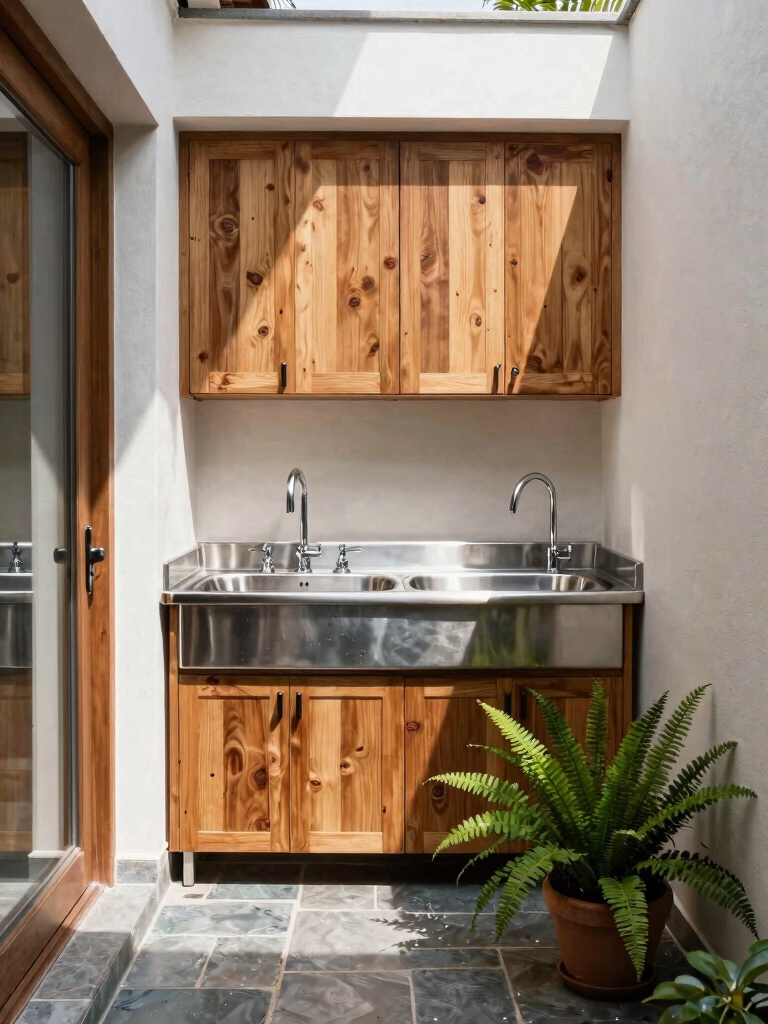
Use a Bar Sink as a Dual-Purpose Laundry Tub
Moving from a mobile cart to a more permanent fixture, I also installed a bar sink next to my washer. Its compact, deep basin is perfect for my outdoor setup, letting me tackle handwashing without taking up much room.
This one simple upgrade gave me a proper utility station.
- Handwash delicate fabrics with ease
- Pre-treat stubborn stains before a cycle
- Quickly fill a mop bucket or watering can
- Rinse off gardening tools in the deep basin
- Clean up pet bowls right where I need to
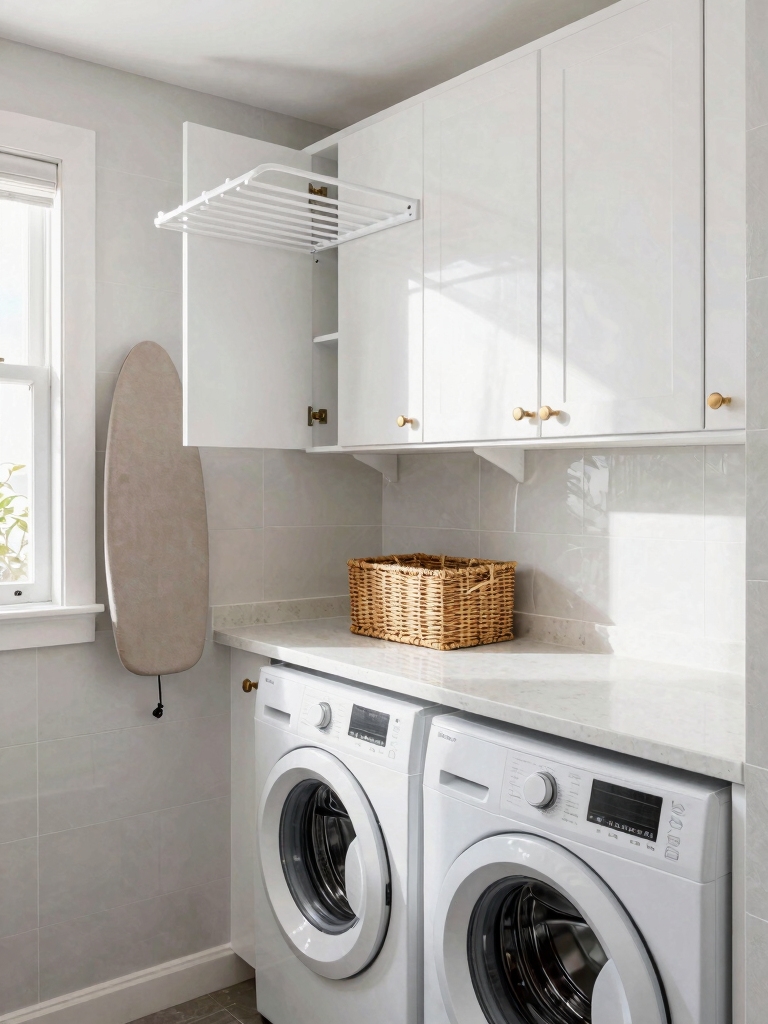
Stow Ironing Boards and Detergent Smartly
While having the right tools at hand is essential, their storage is what keeps an outdoor laundry space truly functional.
I mount a slim, fold-down ironing board inside a cabinet door—out of the weather and my way.
For detergent and supplies, I use clear, airtight containers on labeled shelves.
This simple system keeps everything visible and protected from humidity, creating a workspace that feels organized and efficient.
Add Task Lighting for Evening Laundry Sessions
Because I often finish laundry after sunset, adding dedicated task lighting transformed my outdoor workspace from frustrating to functional.
- A weatherproof LED strip under my cabinets casts a perfect glow on the sorting counter.
- A simple motion-sensor wall fixture eliminates fumbling for switches.
- I chose a bright, cool-white bulb to accurately spot stains.
- Directing a clip-on light onto the washer’s drum makes checking loads easy.
- Solar-powered stake lights illuminate my path on late-night trips.
Blend Your Outdoor Laundry Area With Decor
Seven strategies seamlessly integrated my laundry zone into the backyard’s aesthetic, making it a place I actually enjoy.
I matched my washer’s finish to nearby metal furniture. I used the same outdoor-friendly paint on cabinets and my fence.
Planters with trailing vines soften the appliances’ edges. Coordinating baskets hide supplies.
A colorful outdoor rug defines the space. Finally, I added decor, like a sun-bleached wreath, to make it feel intentional, not industrial.
Conclusion
So there you have it. With a little planning and clever storage, your outdoor laundry can be a blessing, not a chore. It can feel as invigorating as a sunny breeze, making a necessary task quicker and simpler. Just remember to cover the basics, choose durable materials, and tuck everything in its place. Now go enjoy that reclaimed closet space inside.