Start by choosing a multipurpose sofa bed for guests and flexible nesting tables. Lift your bedframe for under-bed bins and use ottomans with hidden storage. I tame cord clutter with adhesive channels and hang mirrors to visually expand the space. Defining zones with rugs and getting collapsible kitchenware keeps everything organized. These hacks create a stylish, functional lounge. There’s more where that came from to truly maximize your compact space.
Begin With Multipurpose Dorm Lounge Furniture
Since you’re likely working with limited square footage, I always begin my dorm lounge by selecting truly multipurpose furniture.
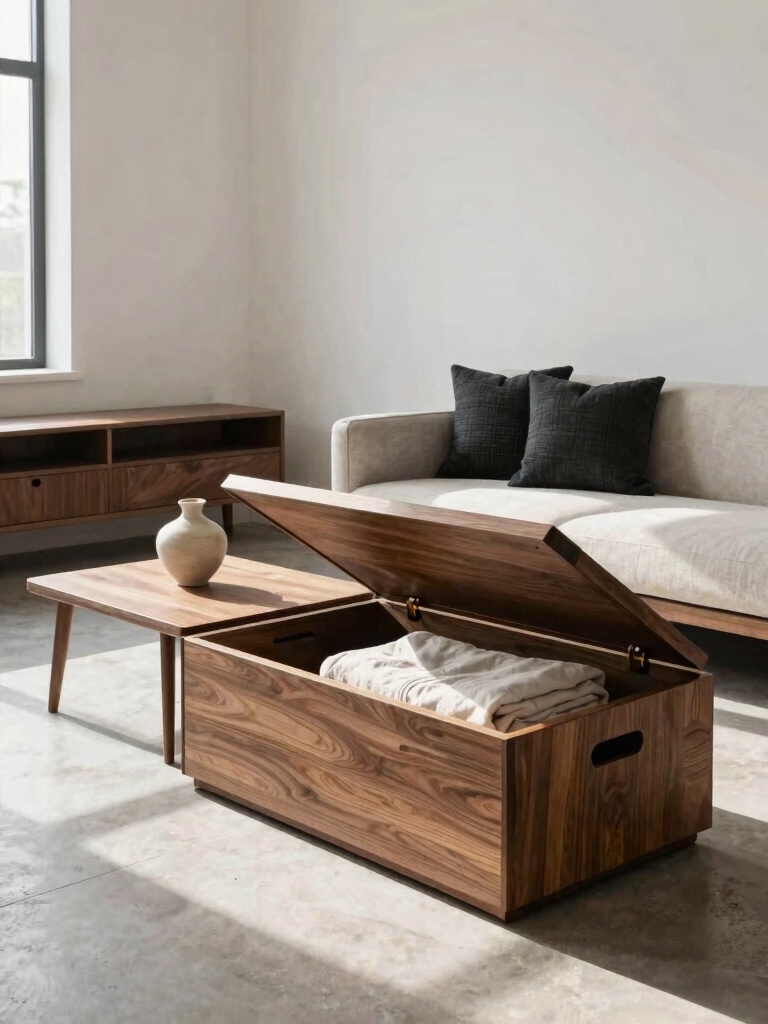
My ottoman doubles as a coffee table with a hidden tray top and offers storage inside.
I use nesting tables I can separate for snacks or stack to save floor space.
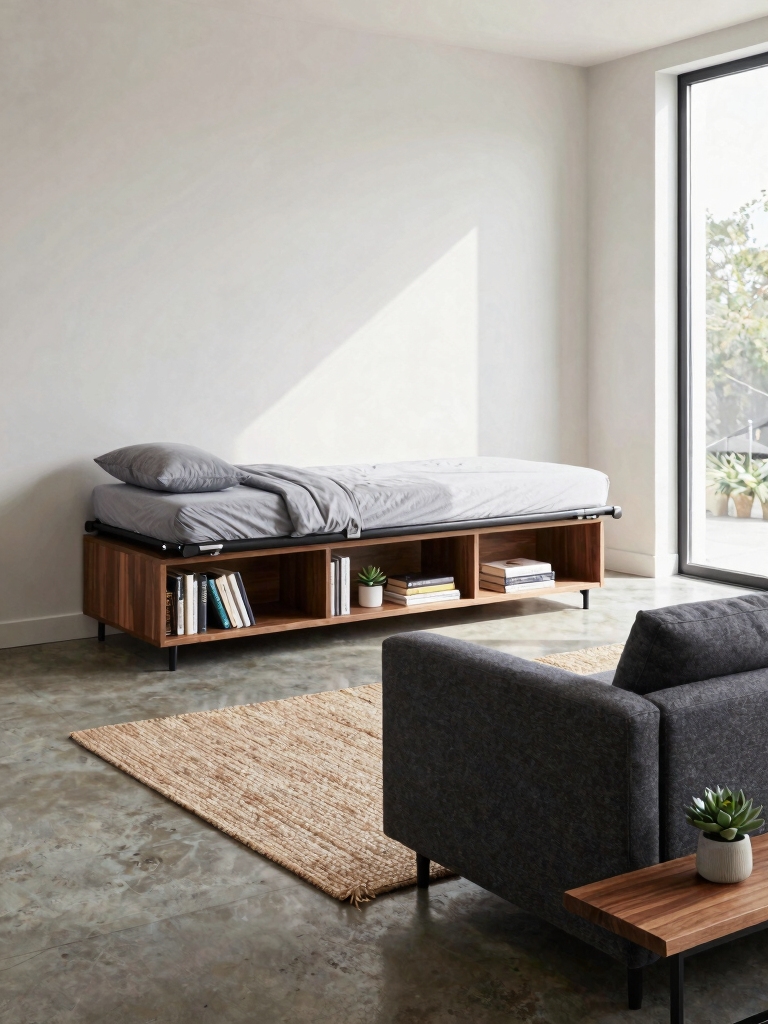
A sturdy, lidded storage bench provides seating, holds my extra blankets, and even works as a makeshift desk.
Incorporating creative space-saving solutions can transform even the tiniest dorm room into a functional and inviting living area.
Choose a Space-Saving Sofa Bed for Guests
I’m looking for a sleeper sofa that folds out from a chic loveseat into a twin bed.
I’ll measure my space carefully to pick a model with compact dimensions that won’t swallow the whole room.
Finding one with built-in storage for spare linens would make it a truly functional anchor piece.
Incorporating smart design tips can help you maximize your small living area efficiently, similar to how you would optimize a laundry room with space-saving hacks.
Sleeper Sofa Style Options
To make sure you’re ready for overnight visitors, start by choosing a sleeper sofa that actually fits your room.
I love a modern, low-profile futon for its casual versatility. A classic click-clack sofa folds down flat and looks sharp.
For real comfort, a plush pull-out with a quality mattress is unbeatable.
Pick a style that reflects your taste—it’s your living space first, a guest room second.
Choosing Compact Dimensions
You’ll want to choose a sofa bed that doesn’t overwhelm your space, so start by measuring your living room carefully.
I always check the sofa’s exact dimensions before buying. Look for a sleek twin or apartment-sized design that tucks neatly against a wall.
Multi-Functional Storage Features
Since you’re choosing a sofa bed, look for one that also offers clever built-in storage.
I love models with hollow arms or a lift-up seat; they’re perfect for stashing extra blankets, pillows, or even your textbooks and gaming gear.
This dual-purpose design means you’re not sacrificing function for space. Your seating becomes a secret command center, keeping everyday clutter out of sight but within easy reach.
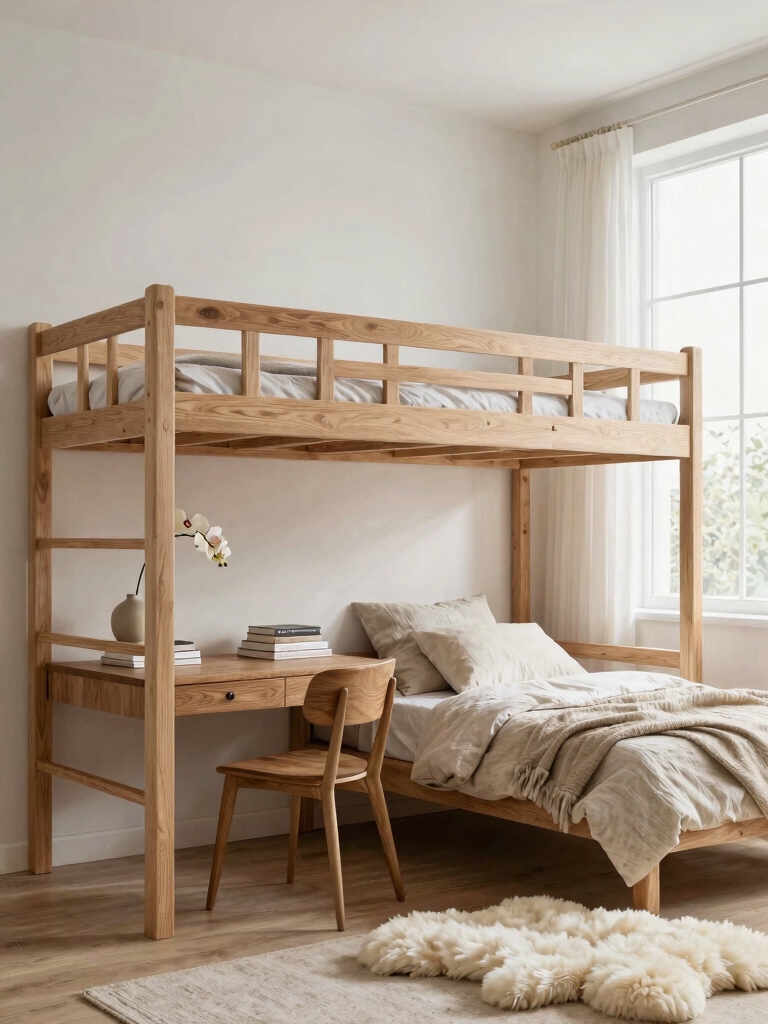
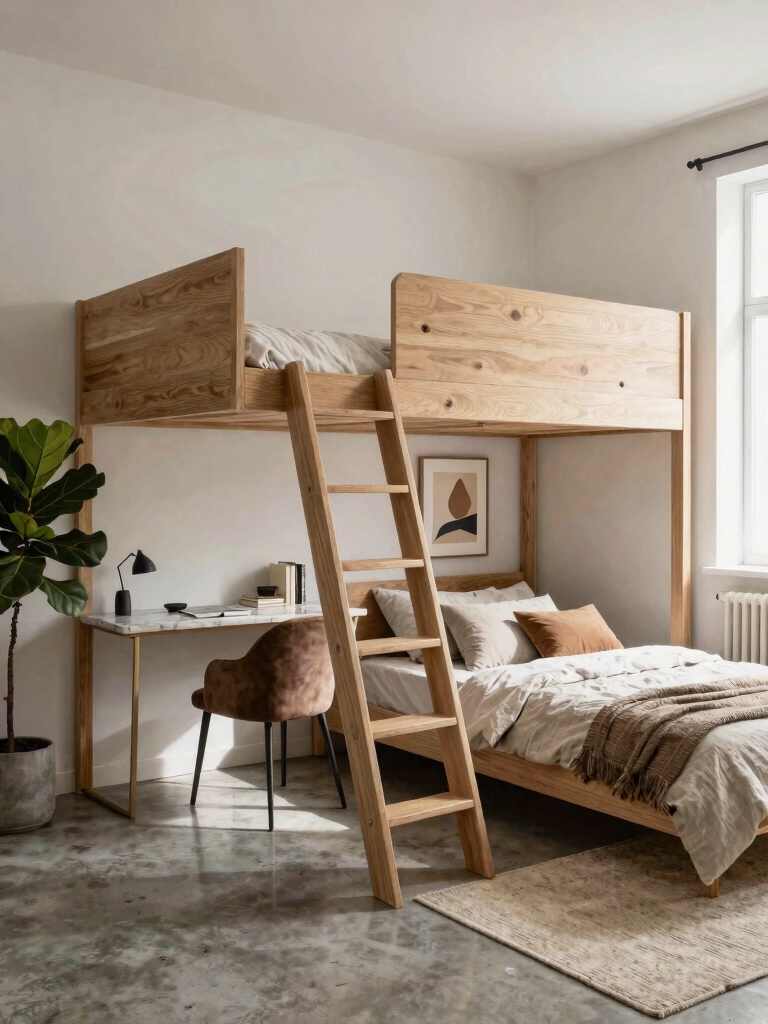
Lift Your Bedframe for Under-Bed Storage
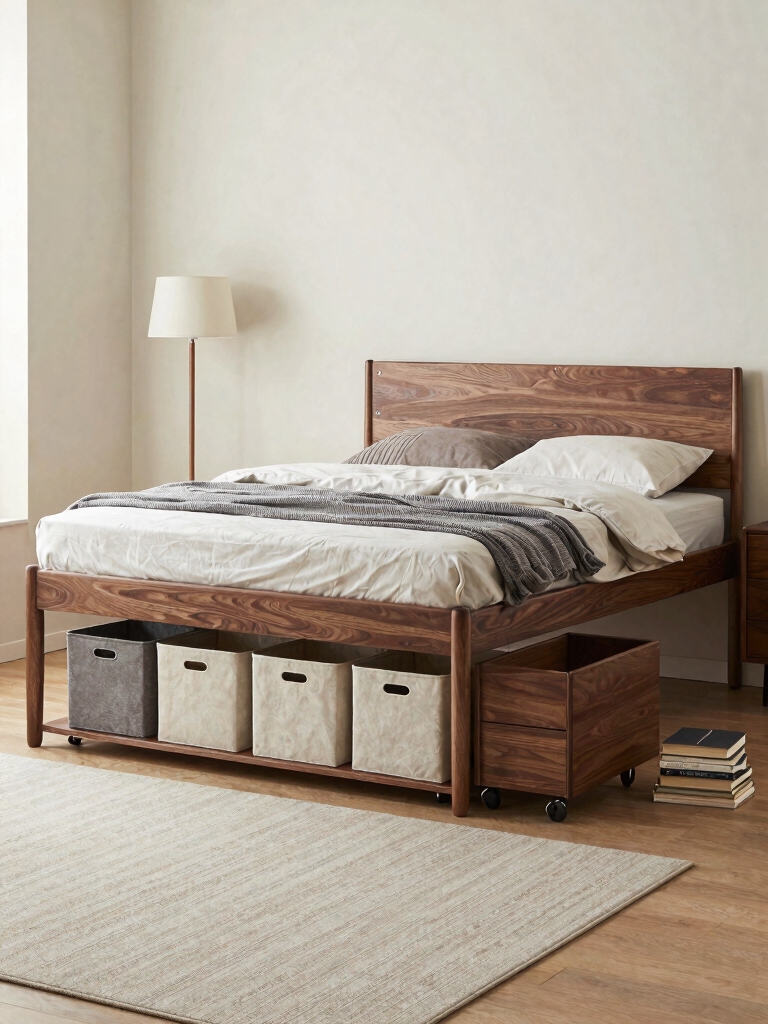
I’ll start by choosing a bedframe that lifts high enough for a generous storage void underneath.
Then, I plan to maximize that hidden space by using stackable containers for my seasonal clothes and bulky bedding.
I’m thinking plastic bins with lids will keep dust out, while flat storage bags work perfectly for blankets I don’t need daily.
These space-saving hacks are essential for making the most out of every inch in a small dorm room.
Choosing The Right Bedframe
How can you squeeze every bit of storage from a tiny dorm room?
I always start with my bedframe. I look for a sturdy metal or solid wood frame with adjustable legs. Cranking them up creates essential vertical space.
For a fixed frame, I add simple bed risers—they’re an instant lift. Just make sure everything’s secure and level before loading bins underneath.
This foundation maximizes my entire room’s potential.
Maximizing Under-Bed Space
Once your bedframe is raised, you’ll want to organize the newfound cavern with purpose.
I group items by how often I need them, stashing seasonal clothes or extra bedding toward the back. I keep shoes and frequently used supplies near the front for easy grabs.
A well-labeled system is my best friend, turning that shadowy space into my most reliable storage closet without a second thought.
Essential Storage Container Types
Choosing the right containers transforms that under-bed space from a cluttered pit into a streamlined system.
I use shallow, clear bins for off-season clothes so I can see everything. For bulky items like extra bedding, I grab flat, wheeled containers that slide out effortlessly.
Finally, I tuck smaller essentials into labeled fabric boxes; they handle awkward shapes perfectly and keep my dorm room feeling tidy.
Use Ottomans With Hidden Storage Space
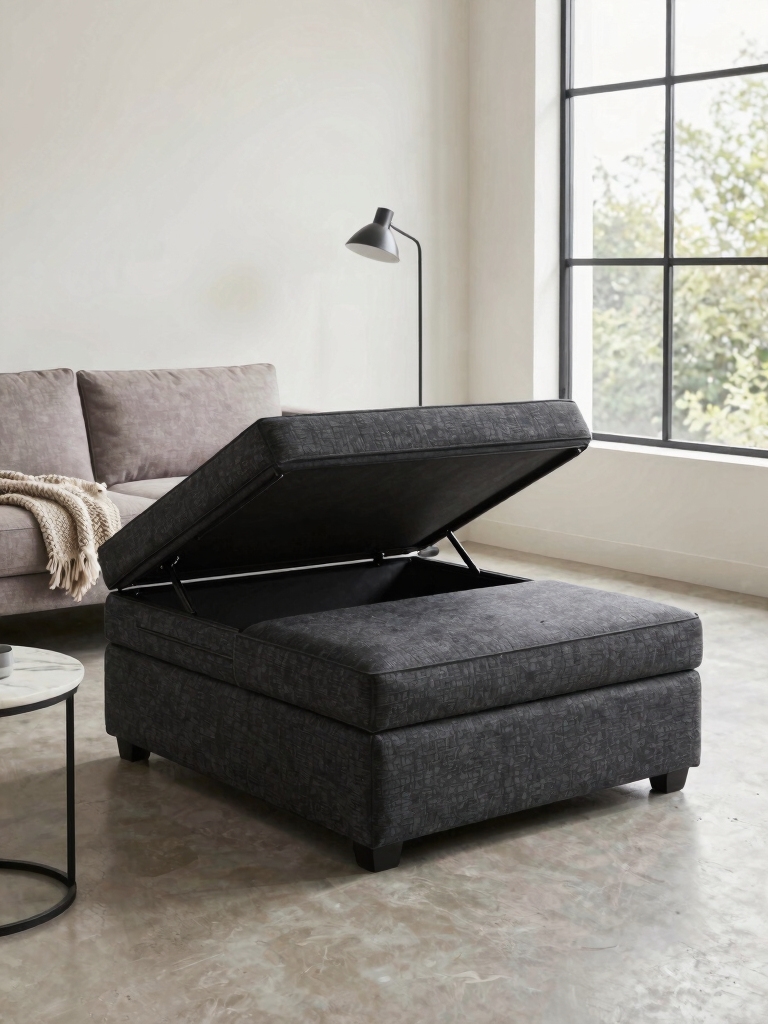
Since your floor space is at a premium, ottomans with hidden storage are absolute game-changers; I treat mine like a Swiss Army knife for my clutter.
Mine’s got a soft, tufted top that’s perfect for seating, and its hollow interior devours spare blankets, textbooks, or board games.
I just lift the lid, stash my stuff, and regain a clean floor instantly—it’s furniture and storage in one compact footprint.
These clever pieces are a key example of transforming tiny spaces by maximizing function without sacrificing style.
Pick Nesting Tables for Flexible Surfaces
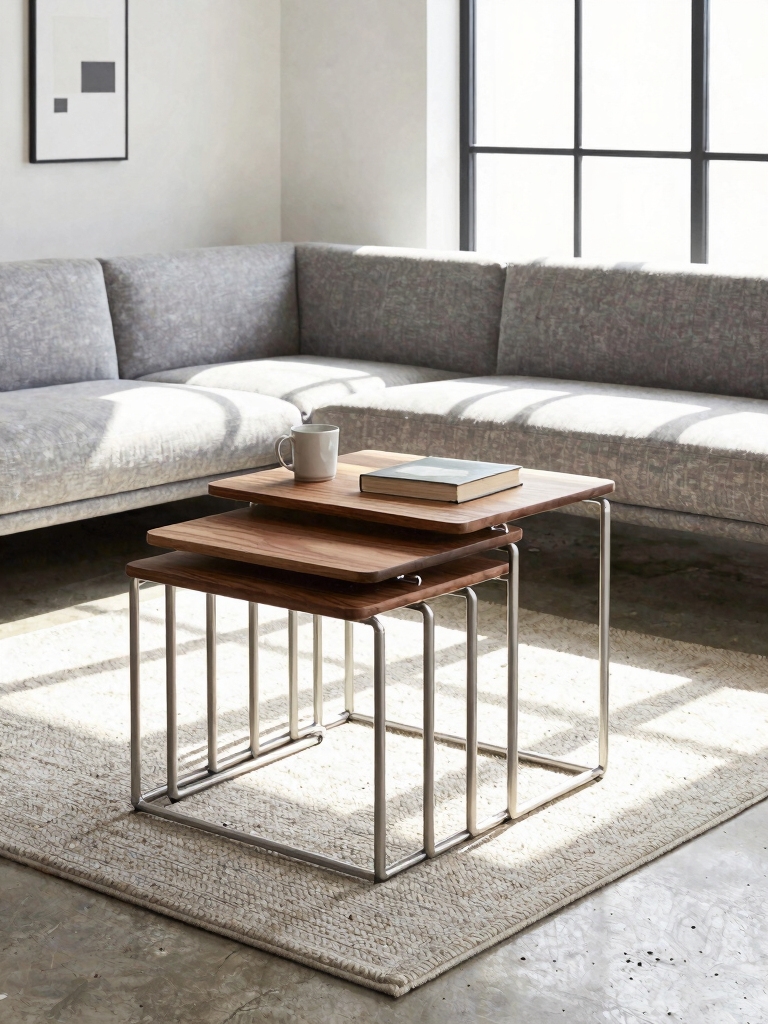
My nesting tables are the ultimate acrobats of dorm living; they pirouette from a single compact unit to a trio of surfaces whenever guests arrive or I need more real estate for a project.
- Use one as a dedicated bedside table for my lamp and phone.
- Slide two together to create a perfect laptop workstation.
- Separate all three to offer snacks and drinks around the room.
- Tuck them away completely when I need clear floor space for yoga.
- Appreciate their slim profile—they vanish under a sofa or in a corner.
Their versatility also helps in creating stylish storage solutions, maximizing both space and style in small living areas.
Stack Storage With Tall Shelving Units
If you have the vertical clearance, towering shelving units become a dorm room’s backstage, managing everything from textbooks to snacks.
I exploit that height with labeled bins to categorize my life. The top shelf holds off-season clothes, while daily items live at eye level.
I even stash my mini-fridge on a lower shelf, instantly freeing up precious floor space. It’s the ultimate vertical organizer for cramped quarters.
Incorporating clever solutions can transform your small space into a cozy, efficient area perfect for college living.
Hang Floating Shelves to Free Up Floors
I always install floating shelves to reclaim precious floor space in my dorm. I start by measuring the wall to find the perfect spot, then pick a sturdy material that matches my room’s vibe. Finally, I’ll arrange my books, a small plant, and a basket for remotes to make it look good and work hard. Incorporating lofted beds can further enhance your space-saving efforts by freeing up room underneath for additional storage or seating.
Selecting Ideal Placement
Since we want to maximize every square inch, hanging floating shelves is a smart way to claim vertical space and clear your floor.
Let’s talk placement. I always survey my room first.
- Corner a collection in an unused corner to display plants or trinkets.
- Anchor a grouping above a desk to keep supplies within arm’s reach.
- Frame a doorway with staggered shelves for visual interest.
- Flank your window to create a balanced, built-in look.
- Avoid major traffic lanes so you won’t bump your head.
Choosing Shelf Materials
Choosing your shelf materials can be just as fun as finding their perfect spot, because the right choice balances durability with your dorm’s style.
I’m opting for a strong, laminate wood bracket that can withstand heavy textbooks. Its sleek, white finish matches my room’s minimalist theme without overwhelming the space.
This sturdy material guarantees my shelves won’t sag, keeping my display secure and my floors clutter-free for years.
Styling With Functional Decor
To maximize your dorm’s floor space, you can hang floating shelves as a clever solution for stylish storage.
I install them above my desk and sofa to keep essentials accessible yet off the ground. They transform bare walls into curated displays.
- Store textbooks vertically to clear your desk.
- Prop up succulents for a vibrant, living accent.
- Line up favorite novels as a personal library.
- Arrange framed photos without a bulky table.
- Tuck away charging cords in small decorative boxes.
Organize Gear With a Wall Pegboard
One wall pegboard can revolutionize your dorm living room’s storage by getting all that loose gear off the floor and furniture.
I hang my headphones, keys, and hats on small hooks, while shelves hold my game controllers and books.
Adding small bins keeps cables and chargers contained.
You’ll customize the layout in minutes, creating a neat, accessible wall system that frees up every other surface instantly.
This simple setup is a prime example of space-saving hacks that maximize every inch of your room.
Use a Rolling Cart for Mobile Storage
Now that our gear’s organized on the wall, let’s tackle the items that need to follow you around. A slim, rolling cart is my command central for daily essentials, freeing up precious floor space. I love its versatility!
- Snack Station: Stash study fuel and drinks.
- Tech Hub: Corral chargers and headphones.
- Bathroom Caddy: Roll toiletries to the hall bath.
- Craft Corner: Keep supplies portable.
- Plant Mover: Shift greenery into the sun.
Using creative storage solutions like a rolling cart is a great way to transform your space on a budget.
Stash Folding Furniture When Not in Use
My favorite space-saving secret involves furniture that practically disappears after I’m done with it.
I stash a folding tray table behind my door and slide a slim, collapsible ottoman under my bed.
For guests, I unfold a compact chair that hooks over my closet rod when not needed.
This way, I reclaim precious floor space instantly for studying or yoga.
Incorporating stylish college dorm room ideas ensures your space is both functional and visually appealing.
Mount Your TV to Save Surface Space
Though I’m a big fan of movie nights, my tiny desk couldn’t handle both a monitor and a TV, so I mounted my screen on the wall. A basic wall mount transformed my cramped room.
- Choose a swivel mount for flexible viewing from your bed or desk chair.
- Verify your wall type (drywall typically needs anchors).
- Use a stud finder for the most secure, wobble-free installation.
- Measure twice before drilling any holes.
- Check your TV’s VESA pattern for mount compatibility.
Tame Cord Clutter With Cable Management
I’ve found that concealing cords with plastic channels is the cleanest solution for running wires along walls or desks.
For keeping individual cables organized, I love using adhesive mounts and clips to neatly route them behind furniture.
Finally, creating a simple label and bundle system with ties stops my chargers and adapters from becoming a tangled mess.
Conceal With Cable Channels
Even though your dorm room is a small space, conquering the inevitable tangle of charging cables and power cords is simpler than you might think.
I use self-adhesive cable channels to route everything neatly along my desk and walls. They’re a game-changer.
- Choose paintable channels to blend perfectly with your wall color.
- Run a main channel from your power strip up your desk leg.
- Use smaller channels for individual device cords.
- Tuck excess slack inside to eliminate loops.
- Snap the cover shut for a completely clean, finished look.
Adhesive Mounts And Clips
Another brilliant way to tame cord clutter is using adhesive mounts and clips for direct, spot-on cable management.
I find them perfect for securing phone chargers to desks or routing TV cords behind furniture. Their adhesive backing means I’m avoiding permanent damage.
I strategically place them along a cable’s path, creating a neat, elevated route that’s out of sight and prevents any messy tangles on my floor.
Label And Bundle System
While adhesive mounts organize cables along their path, a label and bundle system sorts them at their source. I end confusion at my media center by tagging each cord and grouping related ones. It saves me from frantic unplugging during move-out or a study session.
- Use colorful zip ties or velcro straps for easy bundling.
- Write device names on tiny label tags or washi tape.
- Keep a master diagram in your phone’s notes.
- Assign specific colored ties to each roommate’s gear.
- Loop excess length into a neat figure-eight before securing.
Get Collapsible Kitchenware for Easy Storage
Since dorm living rooms often double as snack stations or mini-kitchens, collapsible kitchenware becomes your secret weapon for saving precious space.
I’m talking about silicone bowls that flatten and nesting measuring cups. I stash them in a drawer and pull them out for microwave popcorn or ramen.
Post-snack, they compress back down, freeing up counter space for my laptop or books in a snap.
Hang Mirrors to Visually Expand the Room
If your dorm living room feels a bit cramped, hanging a mirror is my go-to trick for instantly making it seem larger and brighter.
I’ll position one opposite a window to double the natural light and outdoor view.
- Lean a large, ornate floor mirror against a wall for a chic, non-permanent solution.
- Use adhesive hooks to hang a collection of smaller, mismatched vintage mirrors.
- Place a mirror behind a lamp or candle to amplify its glow.
- Opt for a mirror with a shelf to combine function with space-expanding reflection.
- Angle a mirror carefully to capture and reflect the room’s best focal point.
Define Zones With Rugs, Not Walls
A clever, second trick for your shared dorm space is to define distinct zones using area rugs instead of building barriers.
I’d lay a vibrant rug under a seating area and a cozy, textured one near a study desk. This visually carves out a “living room” and “study nook” without blocking flow.
It’s a cheap, temporary solution that adds color and warmth, making each area feel intentionally designed.
Conclusion
I’ve lived these hacks, and each one carves out a precious bit of space and sanity. By choosing multipurpose furniture and clever storage, my tiny dorm lounge finally feels like a true home. Remember, isn’t it amazing how a well-placed mirror or a storage ottoman can completely transform your environment? Put these practical ideas to work and watch your shared space become both functional and inviting.