I’d start by picking a personal theme, like modern glam, to guide my choices. My dream vanity needs serious storage and sturdy, easy-clean surfaces, paired with a functional, adjustable chair. I’d add daylight-mimicking LED strips around my mirror and get organized with acrylic drawers and decorative trays. Styling shelves by color and finishing with greenery, fragrance, and candles creates the perfect ambiance. I’ve got more essential steps to share for building your ultimate beauty space.
Pick a Theme for Your Makeup Room
Before you choose a single color or buy a mirror, I recommend you decide on a central theme, as it will guide every other choice you make.
I start by browsing images for styles I love, like modern glam or boho chic. I pin everything to one board and see what elements repeat.
That core vibe will dictate my wall color, lighting fixtures, and even how I organize my storage.
Refreshing your space with fresh room decor ideas can inspire creativity and make your makeup room feel brand new.
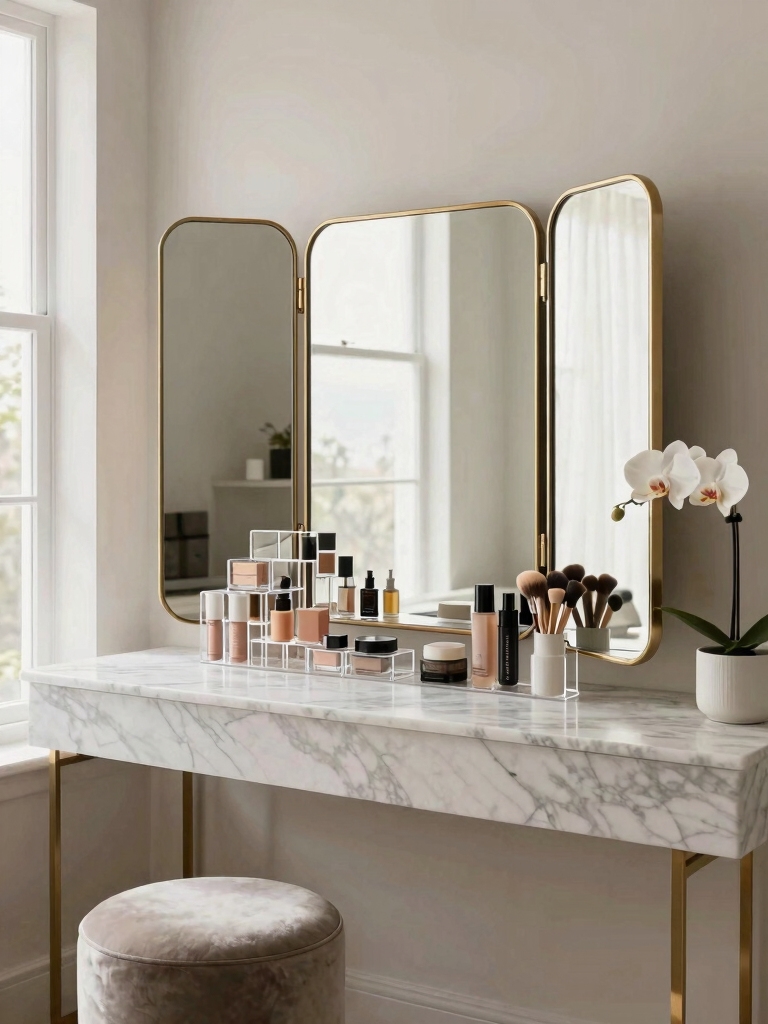
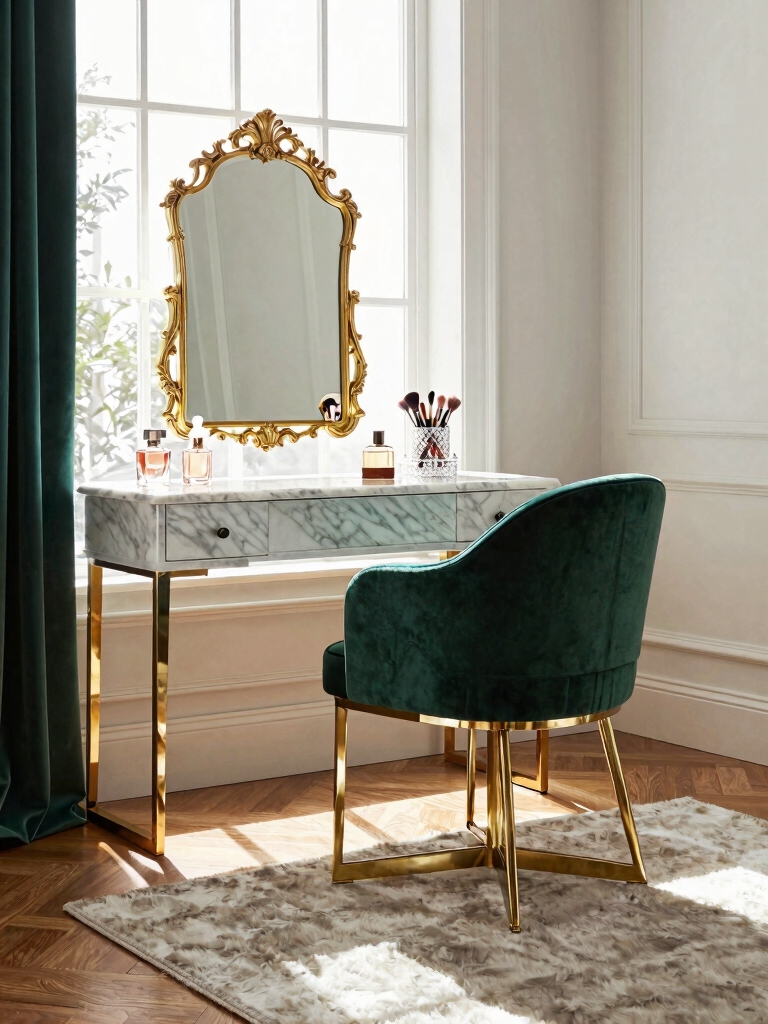
Choose Your Dream Makeup Vanity Table
Once I’ve my theme, I pinpoint the type of vanity I want because its style and size will anchor the whole room. I consider storage, surface, and how it fits my routine.
- Measure Your Space: I verify it fits, leaving room to move.
- Prioritize Storage: I need drawers for palettes and a cubby for brushes.
- Pick a Sturdy Surface: I choose easy-clean materials like glass or sealed wood.
- Maximize Lighting: I’ll add LED strips around the mirror for flawless application.
Adding simple decor elements can transform your space, so I focus on pieces that complement my vanity and create a cohesive look with easy decor ideas.
Select the Perfect Vanity Chair
I think your vanity chair needs to prioritize function over fashion.
You’ll want a sturdy material that can handle daily use without showing wear.
I’d choose a durable fabric or wipeable leather for longevity.
Function Over Fashion
Since it’s where you’ll spend time daily, selecting a vanity chair demands prioritizing comfort and support over pure aesthetics.
I look for chairs with proper back support and a seat height that aligns my eyes with the mirror’s center. A stable, five-point base is non-negotiable for safety.
Consider these functional priorities first:
- Test the seat depth for full thigh support without cutting circulation.
- Guarantee the backrest supports your natural lumbar curve.
- Opt for adjustable height to customize your perfect working position.
- Choose a swivel function for easy access to all your products.
Material And Durability
Because a vanity chair faces daily wear, picking materials that stand up to makeup spills and constant use is essential.
I always look for easy-clean vinyl or leather upholstery. For a DIY touch, I’ll cover a sturdy wooden frame with a durable, washable fabric myself.
Check that the legs are solid metal or reinforced wood; they support your weight and prevent wobbling over time. This guarantees your chair lasts beautifully.
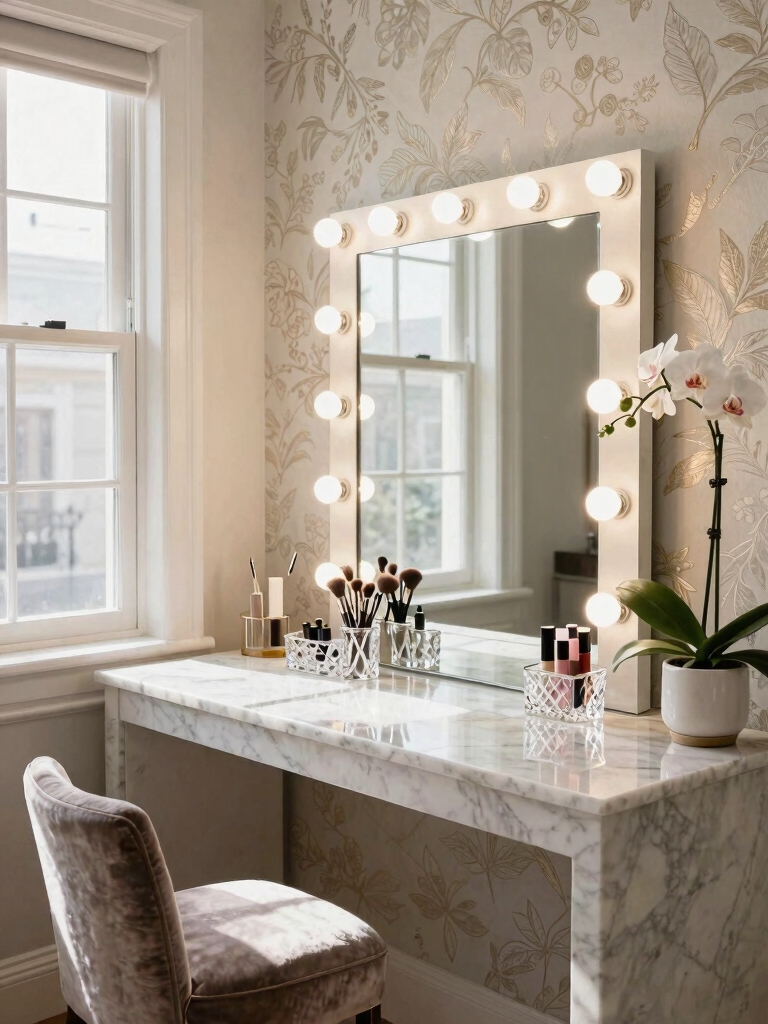
Get the Right Lighting for Your Vanity
Achieving flawless makeup application hinges on proper vanity lighting, so you’ll want to select bulbs that mimic natural daylight.
I position fixtures at eye level to banish shadows. Here’s my DIY guide:
- Use LED strips inside drawers for a soft, built-in glow.
- Install dimmable sconces on each side of your mirror.
- Choose bulbs labeled “daylight” or 5000-6000 Kelvin.
- Add a simple overhead light to fill in any darkness.
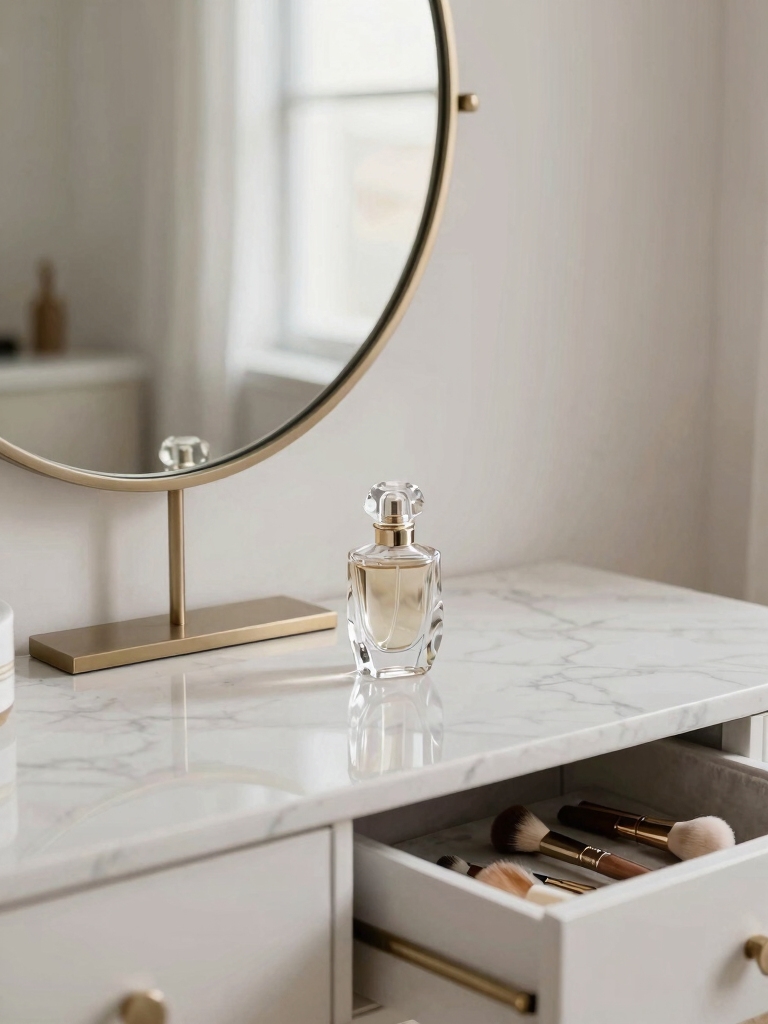
Find a Functional and Flattering Mirror
I’ll start by figuring out the best mirror placement, ensuring it’s directly across from my main light source.
Next, I’m selecting an ideal mirror shape that complements my face and fits the vanity’s scale.
Finally, I’ll check that the lighting around the mirror is bright and even for flawless glam applications.
Optimal Mirror Placement
When planning your makeup space, placing your mirror is the most critical step for both practicality and getting that perfect look. I mount mine directly opposite my main light source to minimize shadows on my face.
Here’s my practical checklist:
- Anchor it at eye level when seated to avoid neck strain.
- Ensure a 12-inch clearance for your elbows while applying products.
- Angle it slightly to check your profile.
- Secure it firmly to the wall for safety during leaning.
Lighting For Glam Applications
Once you’ve positioned your mirror, you’ll need to pair it with lighting that’s both functional and flattering.
I always install bulbs that mimic natural daylight; they prevent color distortion.
Position two sconces or a horizontal light bar flanking your mirror to eliminate shadows on your face.
You can easily install dimmable LEDs for adjustable brightness, ensuring perfect illumination for any application from subtle to full glam.
Selecting Ideal Mirror Shapes
While choosing your mirror’s shape, you’ll want to balance practicality with the visual impact it creates. I consider these points:
- Round mirrors soften a space and are perfect for a minimalist corner.
- Rectangular mirrors give a clean, classic look and maximize your viewing area.
- Arch-top shapes add architectural elegance without sacrificing function.
- Unique asymmetrical forms create a bold focal point for a truly personalized vanity.
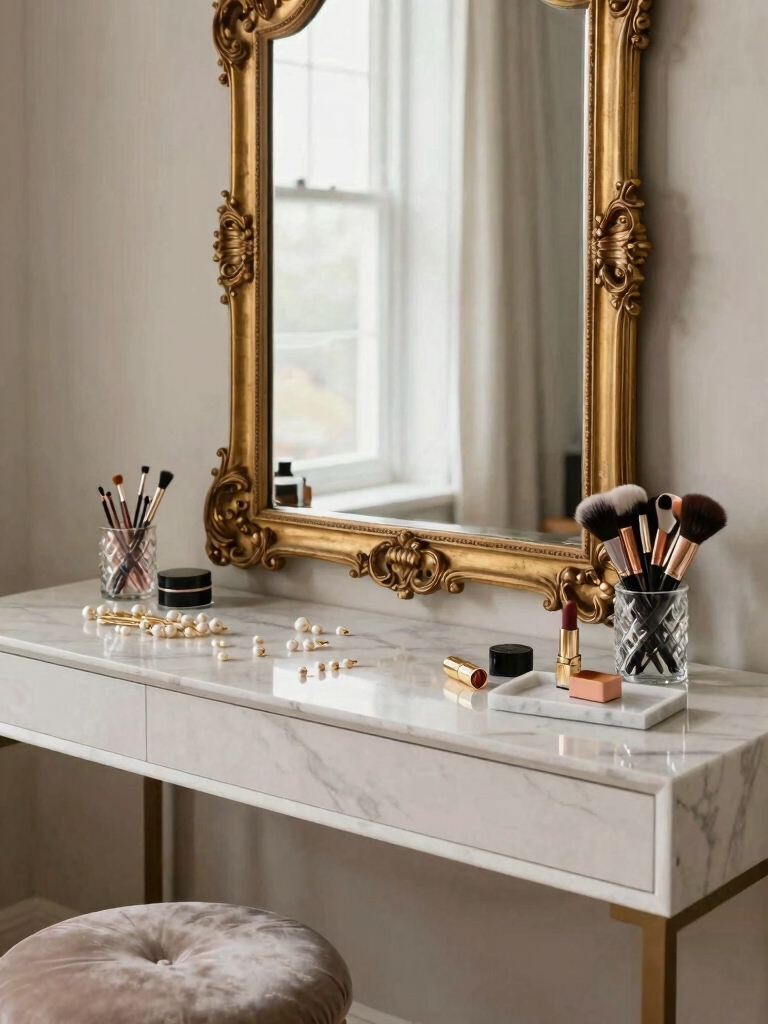
Frame Your Mirror for a Polished Look
Framing your mirror transforms it from a simple functional piece into a polished focal point, and I’ve found it’s one of the easiest upgrades you can make yourself.
I measure the perimeter, then cut lightweight molding with a miter box. I secure it with construction adhesive, fill any gaps with wood filler, and finish with a coat of paint that complements my vanity’s color scheme.
It looks completely custom. Many modern powder room design ideas emphasize the importance of such personalized touches to elevate the overall aesthetic.
Build Your Core Makeup Storage
Now that my mirror’s framed, I’m turning to the counter to organize my daily products.
I’m building a core storage system with items I already own. It keeps my favorites accessible and looks clean.
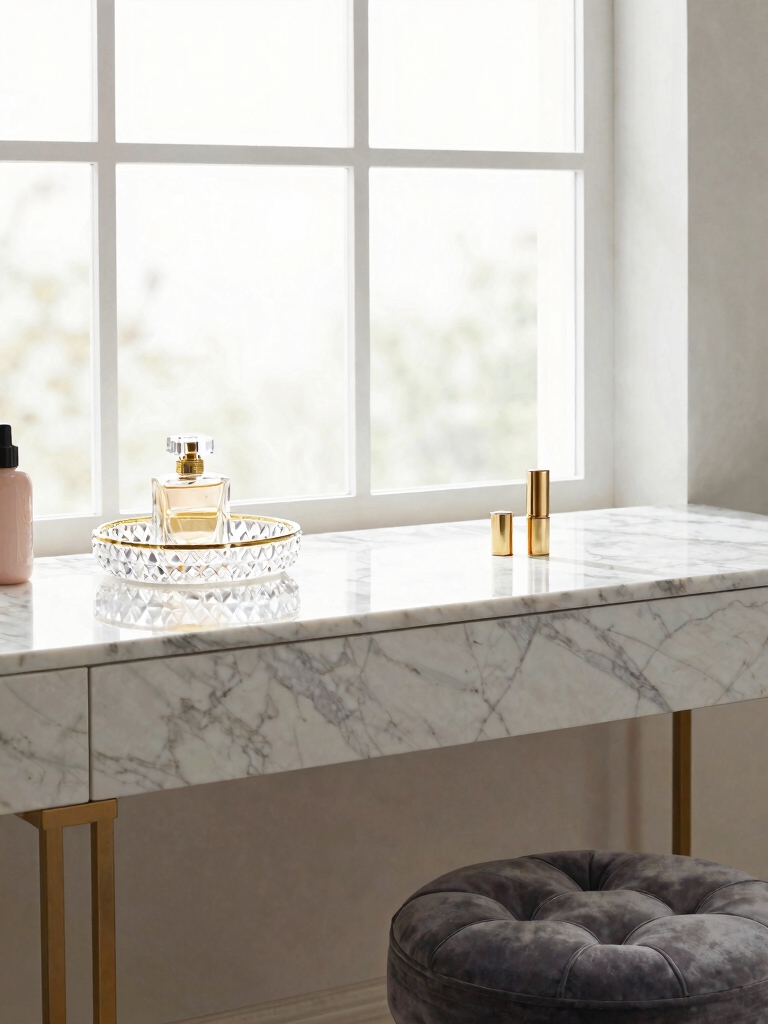
- Use a decorative tray for perfumes and daily lipsticks.
- Repurpose a mug or jar to hold brushes and pencils.
- Stack vintage books to create a tiered display platform.
- Designate a small bowl for everyday jewelry and hair clips.
Organize With Acrylic Makeup Drawers
I always choose acrylic makeup drawers for two big reasons: they offer a clear visual inventory so I can spot any product instantly.
These transparent walls also keep everything displayed in a dust-free environment, protecting my palettes and creams.
Organizing them means I can build a functional system that’s as tidy as it’s pretty to look at.
Clear Visual Inventory
For any makeup lover, acrylic drawers offer a perfect solution to transform clutter into a crystal-clear, accessible collection.
I can see every item at a glance, which stops me from buying duplicates. It’s my daily visual checklist, and I arrange products by category for a streamlined routine.
Here’s how I do it:
- Group all lip products in their own dedicated drawer.
- Store everyday complexion items like foundations and concealers together.
- Use shallow drawers for single eyeshadows and smaller pans.
- Keep brushes and tools upright in a partitioned top section for easy access.
Dust-Free Product Display
An acrylic makeup drawer’s clear sides create a dust-free barrier that protects my products while letting me showcase my favorite palettes and powders.
I arrange items by category, so I grab what I need instantly. This stops me from rebuying things I already own.
I choose stackable units for flexible organization. Keeping everything visible and clean streamlines my routine and makes my vanity look professionally styled every single day.
Display Brushes and Tools Beautifully
While you might typically stash your brushes in a drawer, displaying them can transform them into functional decor.
I love a DIY approach for this. Here’s how I create a beautiful and practical setup:
- Clean all brushes thoroughly first.
- Fill a clear vase or jar with decorative beads to hold handles upright.
- Lay makeup sponges in a shallow ceramic dish.
- Arrange tweezers and liners in a small decorative tray.
Use Wall Organizers to Free Up Space
One brilliant way I instantly clear my makeup clutter is by mounting organizers on the wall.
I use magnetic strips for metal pans, pegboards for palettes and tools, and clear acrylic shelves for daily products.
It gets everything off my vanity surface, turning my walls into functional art.
I can see all my items at a glance, which makes my routine so much faster and more organized.
Incorporating stylish storage solutions not only maximizes space but also enhances the overall look of your makeup room.
Corral Small Items on Trays and Dishes
I love using a simple tray or a decorative dish to organize my daily makeup essentials like lipsticks and brushes.
This immediately declutters my vanity display and stops those small items from scattering everywhere.
It’s a practical trick that also enhances the visual appeal of my setup by creating a neat, intentional arrangement.
Transforming unused corners into functional spaces can further complement this organization by turning dead zones into statement spots.
Organize Daily Essentials
Because those tiny everyday items can easily create clutter, you can instantly tidy your vanity or dresser by gathering them on a decorative tray or in a pretty dish.
I use mine to keep my most-used products accessible but contained.
- Collect daily lipsticks and glosses.
- Group your favorite skincare serums.
- Store hair ties and clips together.
- Place frequently worn jewelry in a small bowl.
Declutter Vanity Displays
Beyond organizing daily essentials, corraling small items like perfumes or makeup brushes on trays creates a vanity that’s both tidy and stylish.
I group my fragrances on a mirrored dish and stand my brushes in a ceramic cup on a coordinating tray. This instantly contains the clutter and defines specific spots for everything, making my routine faster and keeping the surface looking intentional.
Enhance Visual Appeal
Using trays and dishes to group your smaller items elevates a simple organizational step into a true design moment.
I choose trays that match my room’s color scheme, then corral my perfumes, lipsticks, or daily brushes on them. It instantly looks curated and prevents clutter from spreading.
- Use a decorative ceramic tray for your favorite perfumes.
- Place a small marble dish under your everyday lipsticks.
- Corral daily makeup brushes on a rectangular lacquer tray.
- Group cotton pads and q-tips in a shallow, patterned bowl.
Style Your Makeup Shelves by Color
When I’m organizing my makeup shelves, grouping every item by color transforms a crowded collection into a stunning display that makes picking shades a breeze.
I first categorize all my products—foundations, lipsticks, and eyeshadow palettes—into simple groups like reds, pinks, and neutrals.
Then, I arrange them in a gradient order on the shelves. This visually cohesive system is incredibly practical for quickly finding what I need.
Add Personality With Decor and Accents
Since my makeup is now beautifully organized, I can focus on infusing the space around it with my unique style by adding personal decor and accents.
- Prop vintage perfume bottles on a small tray next to my brushes for a glamorous touch.
- Display my favorite statement lipstick tubes in a clear acrylic stand as art.
- Frame inspirational beauty prints in mismatched thrifted frames for a collected look.
- Layer a small, lush faux-fur rug under my vanity stool for instant texture and comfort.
To truly elevate the vibe, incorporate stunning bedroom aesthetic wall decor ideas that transform any room and reflect your personality.
Create a Feature Wall or Backdrop
Now that my vanity top feels personal, I’m turning my attention to the wall behind it. A feature wall frames your reflection.
I’m using peel-and-stick wallpaper in a dramatic floral print for impact. You could also mount a large, ornate mirror or create a grid of smaller ones.
For a DIY look, I’ll stencil a geometric pattern directly onto the paint. It defines the space without needing art.
Large walls offer a perfect canvas to transform your blank walls with stunning decor ideas that make a bold statement.
Finish With Greenery, Fragrance, and Candles
Even with a stunning backdrop behind my vanity, the space doesn’t truly feel alive until I add the final sensory layer of greenery, fragrance, and candlelight.
- Prop a pothos cutting in a decorative vase; it roots beautifully in water.
- Place an essential oil diffuser on a shelf for a consistent, fresh scent.
- Use flameless LED candles in gold holders for safe, soft ambient light.
- Store perfume bottles on a mirrored tray; they double as décor.
Adding these elements helps to transform your space with unique room aesthetic ideas that hit different every single time.
Conclusion
Now I see my dream makeup room materializing. I’ve styled those shelves, lit that perfect mirror, and made it wholly mine. Remember, this is your canvas—each choice is a brushstroke in a portrait of your personal style. So, don’t just follow these ideas, let them spark your own. Grab that paintbrush, rearrange those trinkets, and build a sanctuary that, above all, makes you feel ready to face the world.